日常开发中,如果对接的是终端(前端、iOS、Android、PC等),那就不仅仅是需要完成接口的编码,编写接口文档也同样很重要,因为一份完善的接口文档可以节省后端开发大量和写终端人的撕逼时间,减少很多不必要的麻烦。当然,如果自己一个人把前后端事情的干了,那就另当别论了。
能够写一份好的接口文档很重要,能够高效率的写出且后续易于维护更重要,因为谁也不想把时间浪费在这种繁琐无味的事情上。swagger能帮助我们做到这一点,它是自动生成接口文档,节约了时间,还便于维护。下面介绍一下swagger2在springboot中的应用:
依赖引人
swagger和spring的整合这件事,springfox已经帮我们做了,我们只需要引入相关依赖即可无缝衔接使用。依赖信息如下:
1
2
3
4
5
6
7
8
9
10
11
12
13
14
15
16
| <properties>
<swagger.version>2.9.2</swagger.version>
</properties>
<dependencies>
<dependency>
<groupId>io.springfox</groupId>
<artifactId>springfox-swagger2</artifactId>
<version>${swagger.version}</version>
</dependency>
<dependency>
<groupId>io.springfox</groupId>
<artifactId>springfox-swagger-ui</artifactId>
<version>${swagger.version}</version>
</dependency>
</dependencies>
|
swagger2配置
要使用swagger2,就需要用springfox中的Docket来配置。下面只加入了一些简单常用的配置,高级一点的配置(比如security、response等)可在使用的时候加入即可。
1
2
3
4
5
6
7
8
9
10
11
12
13
14
15
16
17
18
19
20
21
22
23
24
25
26
27
28
29
30
31
32
33
34
35
36
37
38
39
40
41
42
43
44
| package com.lazycece.sbac.swagger2.config;
import org.springframework.context.annotation.Bean;
import org.springframework.context.annotation.Configuration;
import springfox.documentation.builders.ApiInfoBuilder;
import springfox.documentation.builders.PathSelectors;
import springfox.documentation.builders.RequestHandlerSelectors;
import springfox.documentation.service.ApiInfo;
import springfox.documentation.service.Contact;
import springfox.documentation.spi.DocumentationType;
import springfox.documentation.spring.web.plugins.Docket;
import springfox.documentation.swagger2.annotations.EnableSwagger2;
@Configuration
@EnableSwagger2
public class Swagger2 {
@Bean
public Docket buildApi() {
return new Docket(DocumentationType.SWAGGER_2)
.select()
.apis(RequestHandlerSelectors.basePackage("com.lazycece.sbac.swagger2.controller"))
.paths(PathSelectors.any())
.build()
.pathMapping("/")
.apiInfo(apiInfo());
}
private ApiInfo apiInfo() {
return new ApiInfoBuilder()
.title("SpringBoot Swagger2 Restful Api")
.description("SpringBoot 使用 Swagger2 生成 Restful Api . ")
.version("1.0")
.contact(new Contact(
"lazycece",
"https://lazycece.github.io",
"lazycece@qq.com"))
.build();
}
}
|
如果接口添加了权限控制(shiro或springsecurity),那么就需要对swagger的静态资源进行放行。swagger的静态资源路径如下:
1
2
3
4
5
| "/v2/api-docs",
"/swagger-resources/**",
"/swagger-ui.html**",
"/webjars/**",
"favicon.ico"
|
代码案例
swagger提供了众多注解让开发者使用,以此来生成详细完善的接口文档,如:@Api、@ApiOperation、@ApiImplicitParam、@ApiImplicitParams、@ApiModel、@ApiModelProperty等等。下面用代码(简单的用户管理增删查改操作)来展示一些简单常用注解的使用,至于每个注解中参数的说明可在源码中看到。
controller控制器标注:
1
2
3
4
5
6
7
8
9
10
11
12
13
14
15
16
17
18
19
20
21
22
23
24
25
26
27
28
29
30
31
32
33
34
35
36
37
38
39
40
41
42
43
44
45
46
47
48
49
50
51
52
53
54
55
56
57
58
| package com.lazycece.sbac.swagger2.controller;
import com.lazycece.sbac.swagger2.controller.req.UserInfoReq;
import io.swagger.annotations.Api;
import io.swagger.annotations.ApiImplicitParam;
import io.swagger.annotations.ApiImplicitParams;
import io.swagger.annotations.ApiOperation;
import lombok.extern.slf4j.Slf4j;
import org.springframework.web.bind.annotation.*;
@RestController
@RequestMapping("/user")
@Slf4j
@Api(tags = "用户管理")
public class UserInfoController {
@PutMapping("/add")
@ApiOperation(value = "添加用户")
public Object add(UserInfoReq req) {
log.info("添加用户成功: {}", req.toString());
return "success";
}
@DeleteMapping("/{username}/delete")
@ApiOperation(value = "删除用户", notes = "根据用户名删除用户")
@ApiImplicitParam(name = "username", value = "用户名", required = true)
public Object delete(@PathVariable(value = "username") String username) {
log.info("删除用户 {} 成功", username);
return "success";
}
@GetMapping("/query")
@ApiOperation(value = "查询用户信息")
@ApiImplicitParams({
@ApiImplicitParam(name = "username", value = "用户名"),
@ApiImplicitParam(name = "sex", value = "性别", allowableValues = "0,1,2")
})
public Object query(String username, String sex) {
UserInfoReq user = new UserInfoReq();
user.setUsername(username);
user.setPassword("******");
user.setAge(18);
user.setSex(sex);
return user;
}
@PostMapping("/{username}/update")
@ApiOperation(value = "更新用户信息", notes = "根据用户名更新用户信息")
@ApiImplicitParam(name = "username", value = "用户名", required = true)
public Object update(@PathVariable String username) {
log.info("更新用户信息 {} 成功", username);
return "success";
}
}
|
请求参数实体标注:
1
2
3
4
5
6
7
8
9
10
11
12
13
14
15
16
17
18
19
20
21
22
23
24
25
26
27
28
| package com.lazycece.sbac.swagger2.controller.req;
import io.swagger.annotations.ApiModel;
import io.swagger.annotations.ApiModelProperty;
import lombok.Data;
import lombok.ToString;
@Data
@ToString
@ApiModel
public class UserInfoReq {
@ApiModelProperty(value = "用户名", required = true)
private String username;
@ApiModelProperty(value = "密码", required = true)
private String password;
@ApiModelProperty(value = "年龄[0,200]", required = true, allowableValues = "range[0,200]", example = "1")
private Integer age;
@ApiModelProperty(value = "性别", required = true, allowableValues = "0,1,2")
private String sex;
}
|
使用效果
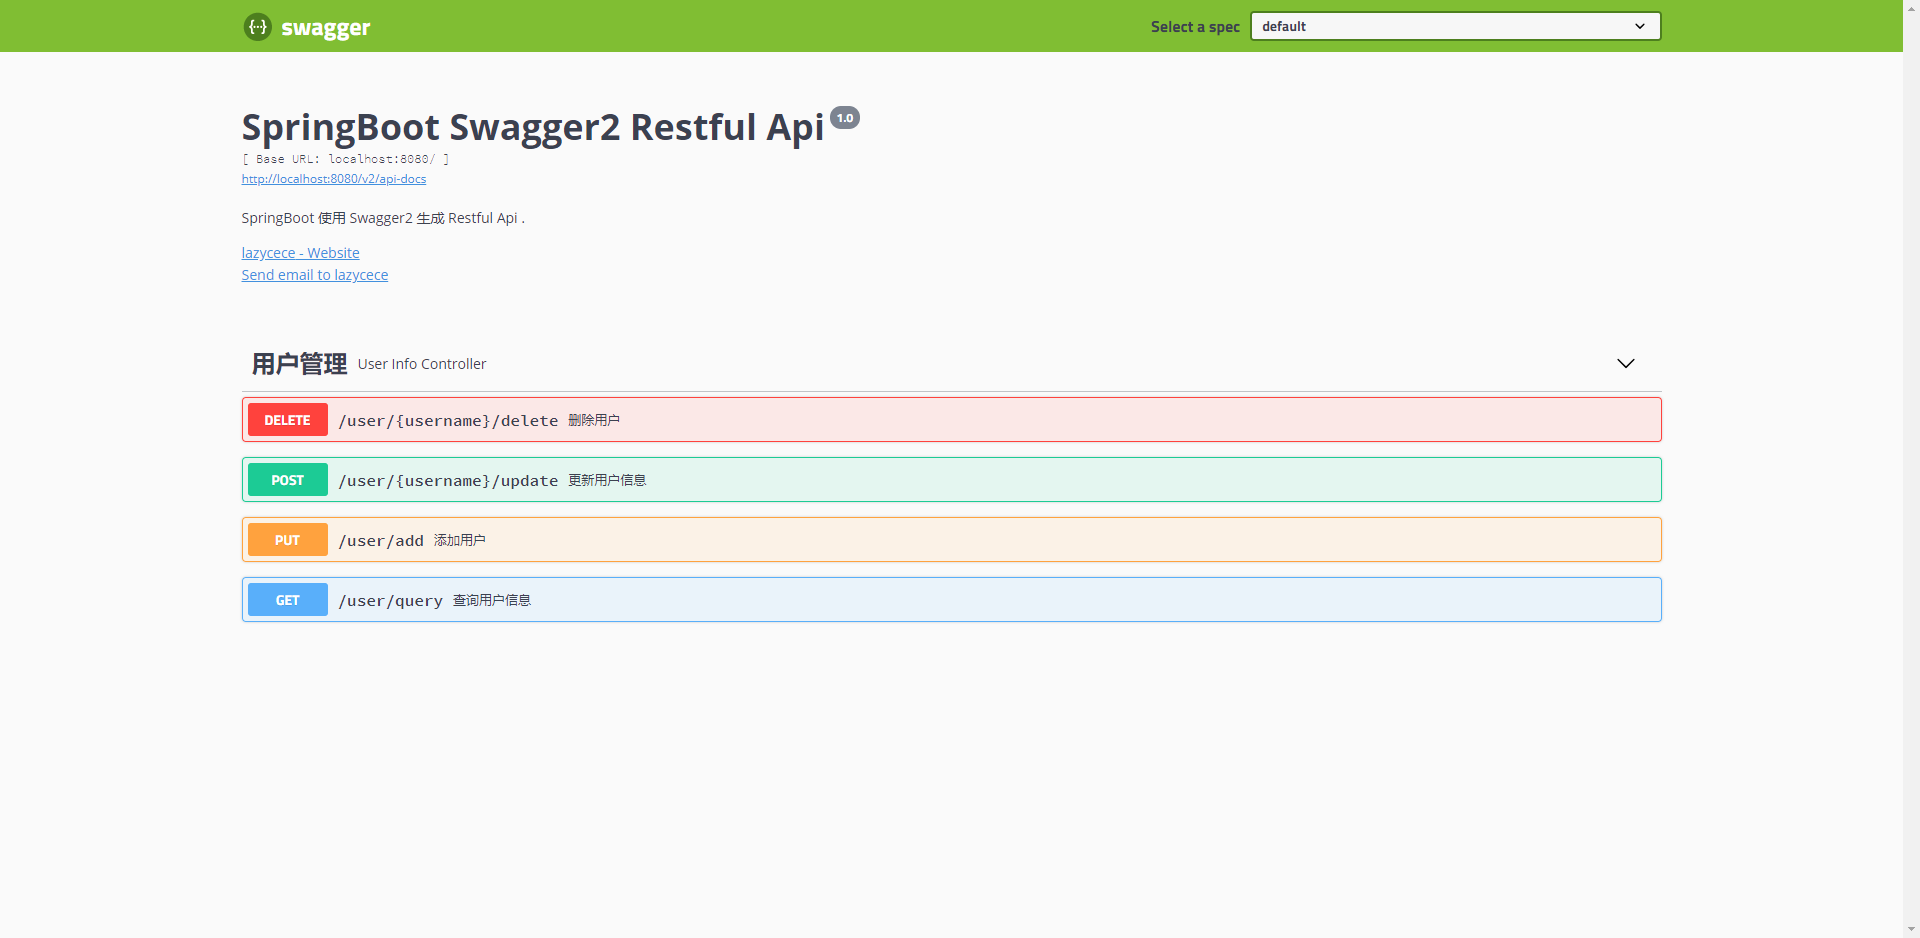
swagger生成的api地址为:http://localhost:port/swagger-ui.html
swagger生成界面
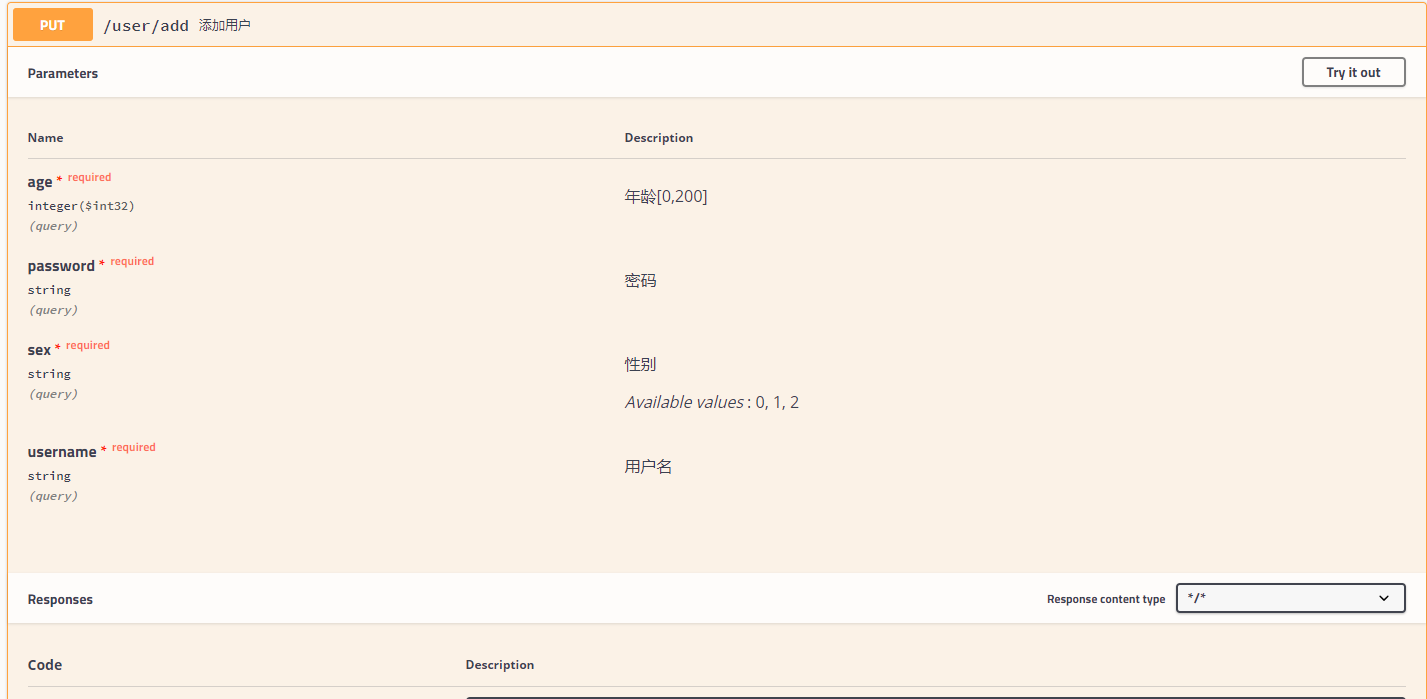
接口详情
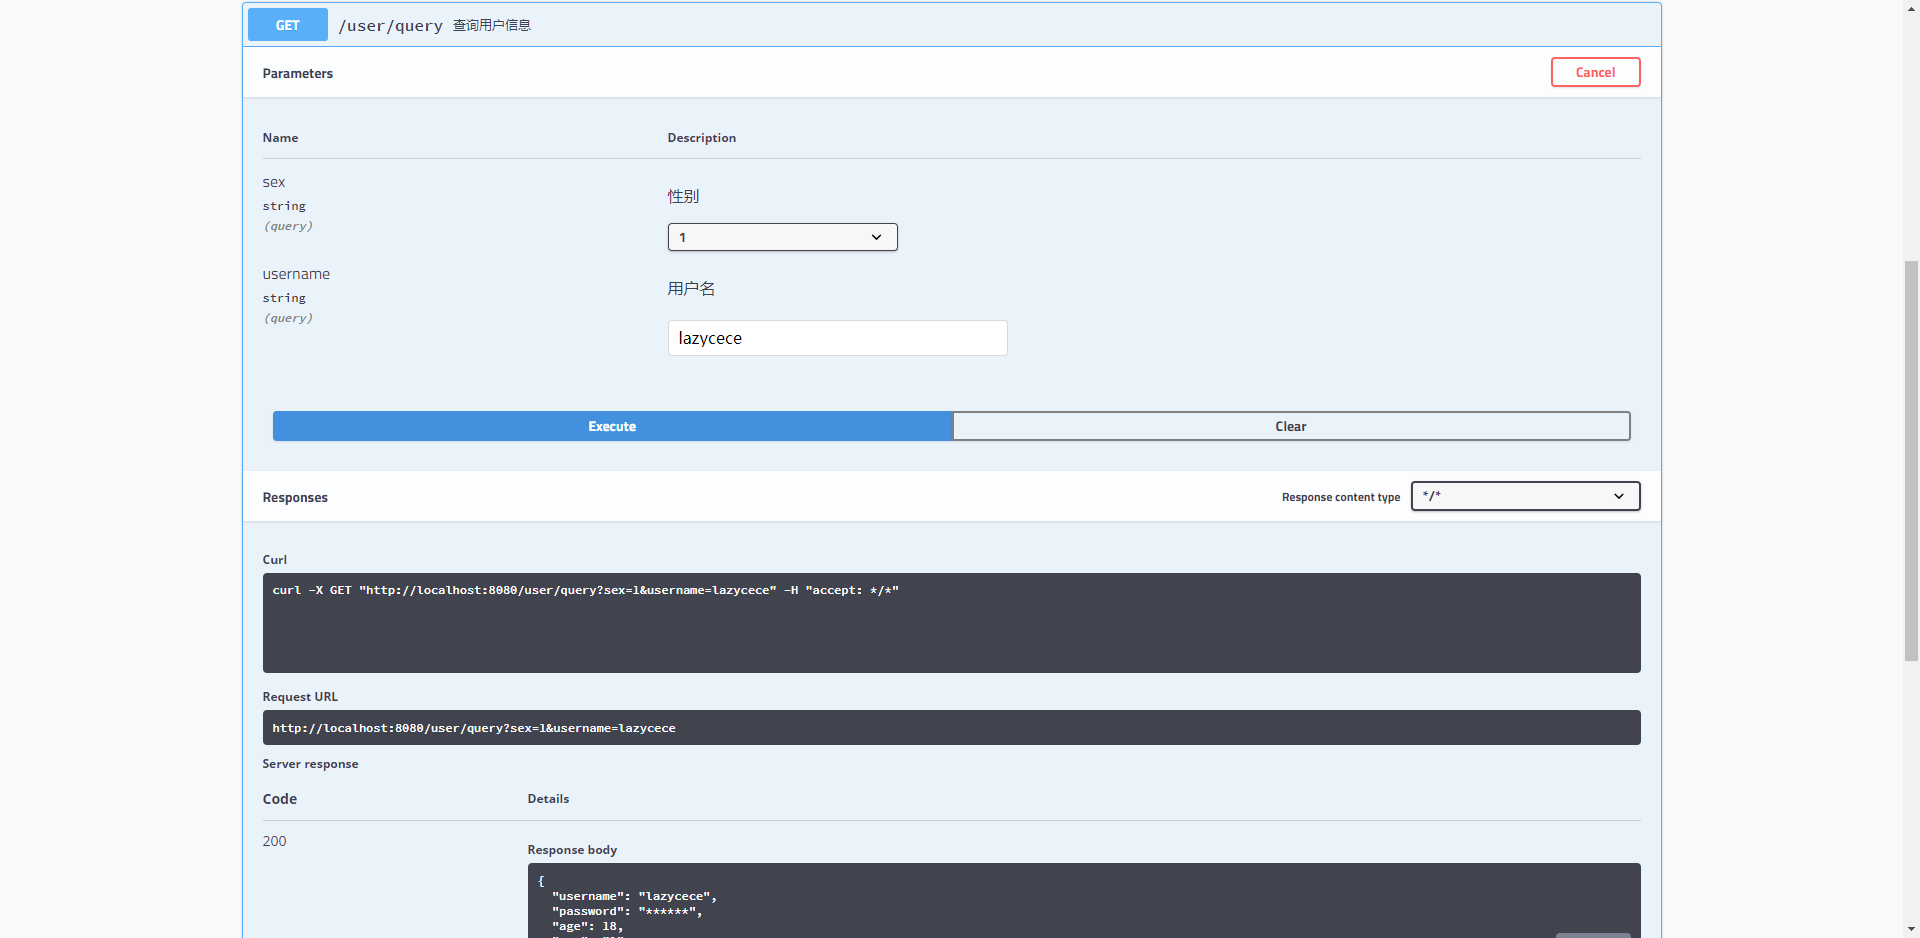
接口验证
相关资源
- 案例源码地址:https://github.com/lazycece/springboot-actual-combat/tree/master/springboot-ac-swagger2
- springfox仓库:https://github.com/springfox/springfox
- springfox官方文档:http://springfox.github.io/springfox/docs/current/
- swagger仓库:https://github.com/swagger-api/swagger-core